Facebook, Twitter and Google authentication with ServiceStack
So, you want to use the awesome authentication feature in ServiceStack to authenticate via Facebook, Twitter and/or Google? It all seems to simple when reading the ServiceStack documentation – but there are still some things that might catch you unaware.
Let’s get started!
Ok, so to authenticate we’re going to need a basic service to authenticate with. I’m going to use a very basic hello world service as my example here. My hello world service looks like this:
1 2 3 4 5 6 7 8 9 10 11 12 13 14 15 16 | |
Simple, eh? And of course I have an apphost which looks like this, I’m using a local MongoDb instance here, but of course you could use any authentication repository you’d like.
1 2 3 4 5 6 7 8 9 10 11 12 13 14 15 16 17 18 19 20 21 22 | |
So…is this enough? No, actually not. You also need to configure the authentication providers, and this is done in the appSettings part of your web/app.config file.
1 2 3 4 5 6 7 8 9 10 11 12 13 14 15 16 17 18 19 20 21 22 23 24 25 26 27 28 | |
Wow, that’s a mouthful of secret codes! We’re going to look at where we get these codes and keys later on. But for now, have a look at the first two configuration options, oauth.RedirectUrl and oauth.CallbackUrl.
These should point at where you want your user to be redirected to when they’ve performed the actual authentication (which happens on facebook, twitter or google). If you want to have different places on your site that your user ends up depending on who they authenticated with you can do so by adding a configuraiton option with the name oauth.PROVIDERNAME.RedirectUrl or oauth.PROVIDERNAME.CallbackUrl if the provider is an oauth2 provider. But generally, you wouldn’t want this. So by omitting the providername you are setting the default fallbackvalue for all providers.
But where do you get these codes? Well, that’s pretty easy. You follow these links and register your app
For facebook, you must register as a developer and then you must create a new app. Creating a new app is done under the Apps menu on top. After you’ve done this, you’ll get your app id and app secret and you can put them in your config file.
But wait! It doesn’t work just yet!

Damn that facebook! Always standing in the way of our authentication heaven! The problem here is that we have not yet told facebook about our website. If we go to the settings panel and click the Add Platform button and add our website, then everything will work perfectly.
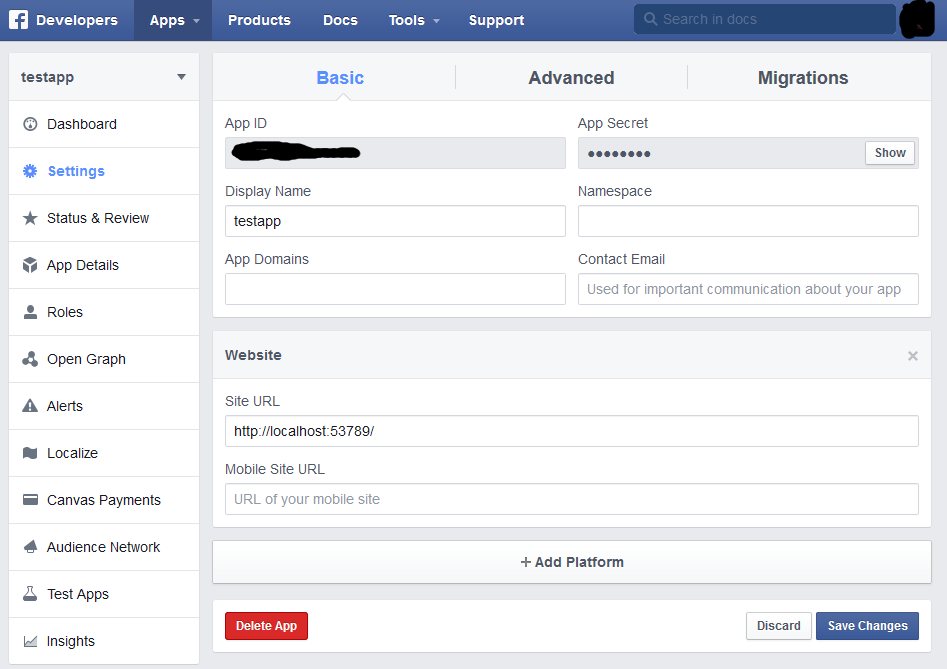
I’m using localhost:53789 here because that’s where I run my development server. If you’re using this in production you should of course put in your real website address here :)
For twitter, you’ll have to “create a new app”. This is pretty straightforward except for one thing. If you’re doing this on your non-production machine and want to type in localhost as your website…don’t!
If you do, you’ll get this fantastic error message which tells you all about what is wrong and how to fix it.

What’s that you say? It doesn’t tell you anything at all about how to fix it? Yea…that’s what I thought as well when I got this error message. However, Stack Overflow was kind enough to tell me that what it really means is that you may not put in localhost as your website. If you want to do that, you’ll have to put in 127.0.0.1 instead. If you do that, everything works! Just go to the API Keys area once you’ve managed to create your application and get your API key and API secret and you’re on your way to greatness!
Please remember that servicestack is using dotnetopenauth for the google authentication, this code wants to run in an ASP.NET environment, so if you try to run this self-hosted you’ll most likely run into problems. If you’re running self-hosted, you may want to skip Google OAuth2.
Create or log in to your developer account and go to the credentials section. What you want to do is to create a new client id. As a web application you’ll need to put in your authorized javascript origins (localhost is fine here), and your authorized redirect uri. You will want to put your callback url as the authorized redirect uri – however you should be aware of that you need to actually put in the full redirect uri here. So for my example I would put http://localhost:53789/auth/GoogleOAuth since that is the actual url of the servicestack handler for google oauth.
Once you’ve created your client ID you’ll get a client secret (this is you api secret) and a client id (this is your api key). Just plug the, in to your configuration and you should be all set!
That’s it?
Yea, that’s really it. The user can now authenticate via facebook, twitter or google by hitting the correct authentication endpoint (/auth/twitter, /auth/facebook, /auth/GoogleOAuth) and the user information will be available in the session unless you hook into the authentication flow and do something else with it before. But more about that some other time!
Now that you have authentication in place, go forth and write code that actually does something. :)